Getting Started
English | Français
Périmètre annoncé : Unity 6000.2 ou ultérieur, URP, Windows / Android / iOS. Les quatre biomes fournis sont Forêt, Tropical, Neige et Automne. Voir la compatibilité et les vérifications.
Importer le Core, puis le Starter unitypackage optionnel pour les exemples modifiables sous Assets/SorolifMapGenerationStarter. Une mise à jour du Core ne remplace pas ce dossier. Voir Installation du Starter.
Choisir d'abord Biome. Biome preset n'affiche que les BiomeSetting correspondants et sélectionne une valeur compatible : preset Starter modifiable, puis réglage de référence du Core, puis un autre asset correspondant. Un preset personnalisé compatible est conservé. Cela fonctionne en modes Simple et Expert. Select biome preset to edit ouvre ses réglages. Si aucun preset compatible n'existe, l'Inspector explique le fonctionnement automatique de secours. Les surcharges directes de matériaux et de prefabs gardent la priorité.
Le menu Biome propose uniquement les types ayant un BiomeSetting disponible :
Forest, Tropical, Snow et Autumn dans les exemples fournis. Show In Biome Selector
est activé par défaut sur les nouveaux presets ; le désactiver pour un contenu
inachevé ou optionnel. Pour proposer un autre biome, créer son BiomeSetting, choisir son type
et laisser cette case cochée. L'enum reste complet. Les références explicites et
la génération runtime restent utilisables même si le preset est masqué.
Chaque racine générée contient Generated Map Info : seed, biome, symétrie,
paramètres principaux et repères stratégiques. Select Map Information sur le
générateur sélectionne ce composant ; Show Gizmos et Show Labels contrôlent
les repères dans la Scene view. Voir Informations de la carte.
For prefab placement rules and their Inspector, see
Props Placement / Placement des props.
For grass prefabs and GPU instancing, see Grass Details:
select the generator, click Apply dense grass preset (screenshots) in
Terrain style, then Generate Map. This enables props and grass with
chance multiplier 1 and height 0.5–0.8. Older biomes without grass rules use the included
prefabs automatically; authored grass rules remain authoritative.
Zero-setup demo
For an in-Editor walkthrough, open Tools > Sorolif > Map Generation > How To Use.
The guide includes eleven topics with numbered steps, English/French language
selection and accent-insensitive search. The How To Use / Aide button in
the Inspector and the ? buttons beside Simple/Expert sections open the
relevant topic. Reading the guide never changes your map settings.
Start with Your first map, then follow Procedural layout or Import
an image. Other pages cover map altitude, biome materials, contour smoothing, dirt paths,
water and cliffs, PNG export, runtime code and troubleshooting. Explicit action
buttons create demos/assets or select relevant objects; generation remains an
Inspector or runtime action. The runtime page provides a copyable, complete
MapBootstrap.cs example. Select the complete offline guide highlights the
corresponding documentation asset in Project.
Use Tools > Sorolif > Map Generation > Create Starter Demo Scene. Choose a scene location. The command creates independent biome settings referencing Core/Art, lighting, a camera and a complete generated map; existing settings are preserved.
See WaterRendering.md for the Forest, Snow, Tropical and Autumn
water materials, camera setup and shader controls.
See MountainRendering.md for the rock transition at the
foot of mountains, contour smoothing and preserved physics layers.
The same wizard prepares four biome presets (Forest, Tropical, Snow and Autumn), backed by the package's own
textures and configured source-model prefabs, with shared cube-based resource placeholders. Select Biome preset to change the visual starting
point. Details are in StarterAssets.md.
To evaluate image-driven generation without preparing an asset first, use Create Image Import Demo Scene. It uses the packaged Examples/ImageImport/StarterImageMap.png, creates a matching editable palette under Assets/SorolifMapGenerationStarter, and leaves the source image and palette assigned on the generated scene for inspection.
The Welcome & Setup window presents this action on first import and once after each package update. Reopen it at any time from Tools > Sorolif > Map Generation > Welcome & Setup. Its readiness section checks the packaged shaders, biome discovery, optional Unity Layers and the currently selected generator. The same report is available through Run Setup Check.
The demo uses a fixed seed so its result is reproducible. Its generator remains editable: change the seed or terrain settings in the inspector and click Generate Map to explore variations.
1. Create a generator
Use Tools > Sorolif > Map Generation > Create Map Generator. The command creates a GameObject with MapGenerator and a default MapDefinition.
The generator creates its output as a child hierarchy. Re-generating replaces that hierarchy while preserving the generator component and configuration.
The inspector starts in Simple mode. This view is intended for normal production use and exposes the map source, players, strategic density, main terrain features, resources and seed. Use the Balanced, High Ground or Naval quick-start buttons to configure a coherent baseline before adjusting individual features. Select Expert at the top of the inspector to tune every algorithm, rendering override, water/cliff parameter, screenshot option and scene integration reference. Switching views never discards hidden values.
Les nouvelles recettes démarrent avec une rivière principale, les prefabs de pont du biome, des forêts, des massifs et deux objectifs contestés. Additional Naval Zones et les Choke Points artificiels valent zéro au départ : la rivière fournit déjà un passage stratégique naturel. Augmenter ces valeurs explicitement pour ajouter des cours d'eau ou des goulots imposés. Balanced rétablit ce profil et réactive les ponts après un autre préréglage. High Ground utilise des plateaux et leurs rampes, sans eau. Naval utilise des îles et demande un transport naval entre les terres séparées. Les boutons conservent le biome choisi, la taille, le nombre de joueurs, la seed et les sorties. Les recettes déjà enregistrées gardent leurs valeurs ; sélectionner explicitement un préréglage pour adopter ses réglages.
La taille initiale de 70 cellules laisse de la place pour deux joueurs et leurs extensions naturelles. Une carte très petite peut manquer de place : le diagnostic expansions.capacity indique alors combien de joueurs n'ont pas reçu toutes les extensions demandées. Augmenter Map Size ou réduire Expansions Per Player dans ce cas.
Expert options are grouped into separate collapsible sections, including
individual plateau/ramp, forest, mountain, image-smoothing, river, bridge,
island, lake and cliff-fitting groups. Section state is stored in Editor
preferences and never changes the map recipe.
The hidden MeshGround/AerialGround mesh and its collider provide an optional
flight surface on the Aerial layer (falling back to Ignore Raycast when that
layer is absent). It follows the final ground and water, including global
altitude, with at least 3 world units of vertical clearance. Mountains do
not raise the flight level: the continuous surface passes through the massif,
and rock protruding above it remains a physical obstacle through its own collider.
A conservative margin near steep ground breaks can add clearance. Regenerate
the map, then rebuild your navigation data if your game uses a separate navigation
bake, including protruding rock as obstacles.
The renderer stays hidden; no navigation package is required. See Aerial navigation for diagnostic views.
Assets can be assigned directly on MapDefinition, supplied through its
explicit Biome Override reference to a preset anywhere in the project. Select
a compatible preset in the Inspector, or assign MapDefinition.BiomeOverride
in code. Leaving it empty uses directly assigned local materials and prefabs.
All included art is stored under Art; runtime generation reads serialized
asset references.
Recommended minimum setup:
- Grass Material
- Plateau Material when a distinct high-ground surface is desired; it falls back to Grass Material
- Dirt Path Material
- Water Material when water is enabled
- River Bridge Prefab avec un collider de tablier praticable non-trigger lorsque les ponts de rivière sont activés
- Mountain Material when mountain zones are enabled
- Cliff Prefabs when cliffs are enabled
- Gold Mine and Oil Field prefabs when those resources are requested
Direct material and prefab values on MapDefinition take precedence over the
resolved BiomeSetting. When Biome Override is empty, the original
recipe uses its explicitly assigned local assets. Assign a compatible biome
preset to use the supplied complete art setup.
Les rampes sont ajoutées à l’extérieur du plateau sans supprimer ses faces. Plateau Ramp Length (5 cellules par défaut, plage de 2 à 18) règle la longueur de la descente : courte et raide, ou longue et douce. Les surfaces et colliders de rampe utilisent le layer partagé Walkable, configuré dans la carte par Walkable Layer (ramps and bridges). Aucun layer Ramp dédié n’est nécessaire. Si le layer configuré manque, le générateur utilise le layer de sol configuré, puis Default.
To create only the starter visual assets, use Tools > Sorolif > Map Generation > Create Starter Biome Assets. It creates editable triplanar terrain materials, original stylized grass/forest/dirt/sand/rock texture copies, four BiomeSetting presets (Forest, Tropical, Snow and Autumn), and cube-based resources, trees, rocks, cliffs and a river bridge under Assets/SorolifMapGenerationStarter.
Cette action réserve un emplacement libre de layer utilisateur sous le nom Walkable, pour les surfaces de rampe et les tabliers des ponts. Les noms existants ne sont jamais remplacés. Si aucun emplacement n’est libre, le contrôle de configuration signale le layer manquant.
Les colliders des tabliers de pont utilisent aussi Walkable. Les barrières utilisent le layer Environment configuré. Les projets personnalisés doivent définir ces layers dans Tags and Layers.
Triplanar terrain rendering
The included Sorolif/RTS Terrain/Triplanar shader is selected automatically for newly created starter terrain materials. Use Top Texture for horizontal terrain and Cliff / Side Texture for steep faces. World Texture Scale controls world-space tiling and Projection Blend controls how sharply projections meet.
Sorolif/RTS Terrain/Triplanar Stylized adds banded lighting, slope accents and a rim highlight for readable low-poly or illustrated maps. The starter asset command creates Triplanar_Stylized_Preset.mat as an editable example. Both shaders avoid visible UV stretching on plateau walls, mountain slopes and generated cliffs. Detailed property guidance is available in TriplanarShaders.md.
3. Generate procedural maps
With Enable Map Altitude active, the map perimeter is closed automatically by
rock faces down to a common base. MeshGround/MapSides follows the rendered
terrain, including paths and coastal floor extensions, and has a matching
collider. It uses Mountain Material, then Env Material or Grass Material as a
fallback. Existing mountain border faces are continued below their lower edge.
Select Procedural as the generation mode, choose the map size, player count, symmetry and water layout, then click Generate Map.
For reproducible output, disable Use Random Seed and provide a fixed Seed. The same configuration and seed produce the same logical map layout.
Set Choke Points above zero to funnel travel between player territories through
narrow passages. Continuous dividers use forests when enabled, or rock ridges
when forests are absent; existing mountains and water remain obstacles. In the
Islands layout, irregular low islands narrow the sea into straits of varying
width, including the outer sea route. Forest settings populate woodland when
matching props are configured; mountains add optional rock cores. Nearby neutral
expansion islands can join these formations without moving their resources or
changing the expansion count. Player coastlines retain an open-water apron. Naval passages remain water and do not create dirt paths.
Planning uses the final relief, ramps and bridge decks, preserves settlement
clearings, and reconnects approaches through legal terrain. Constrained terrain
can require additional openings to keep existing settlement access. Zero
disables these strategic dividers. Regenerate the map to update its passages.
With multiple passages, openings spread along the territory boundaries and need
broad approaches on both sides. Tiny isolated pockets are avoided. Land roads
share a collector with a single connection from each town, rather than one long
road from every base to every passage. Adjacent ramp/deck openings share one
marker. If safe spacing cannot fit the requested count, optional openings are
skipped; access-preserving openings can still increase the count.
| Land passage |
Naval strait (Islands) |
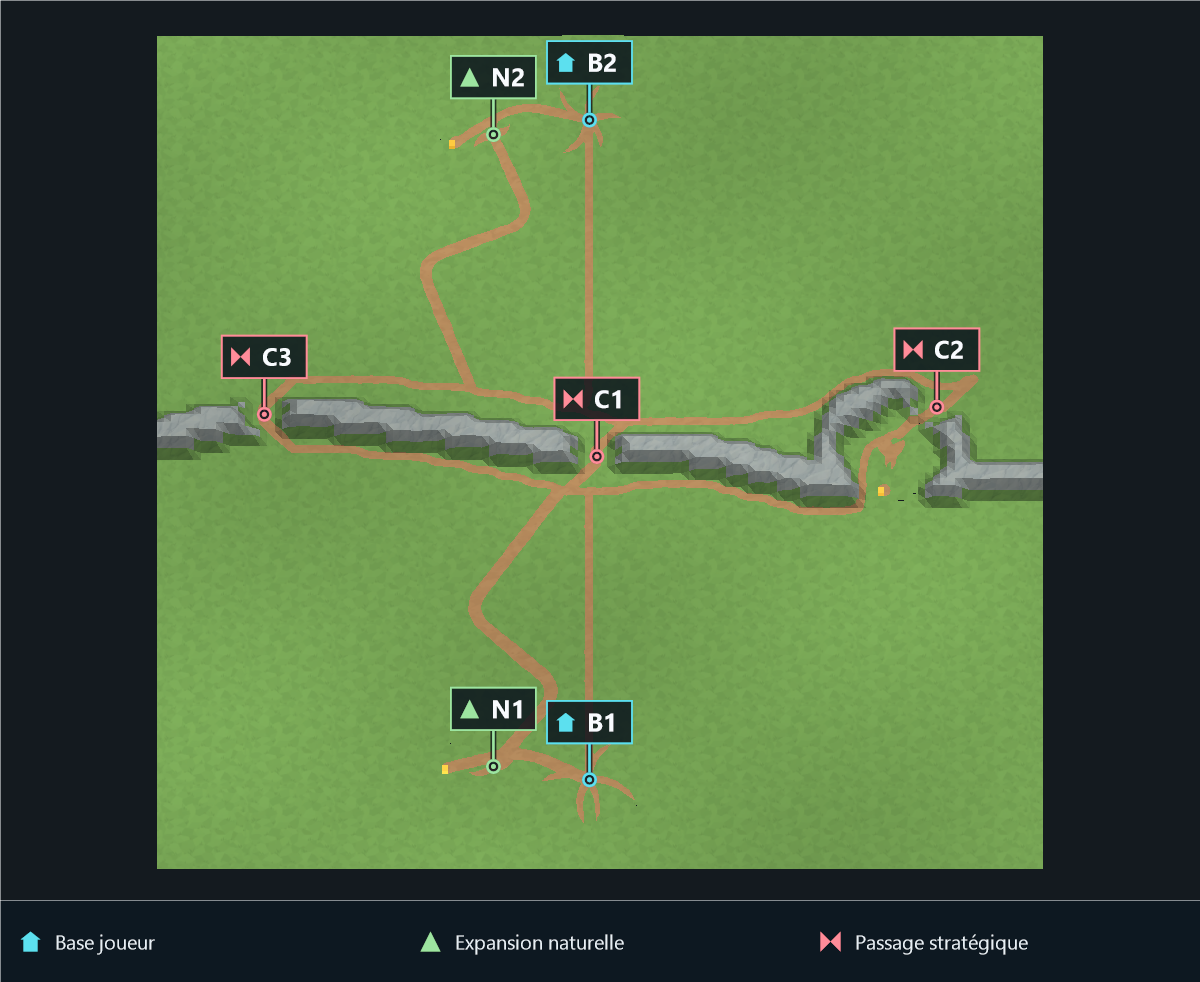 |
 |
B marks main bases, N natural expansions, X contested expansions
and C the actual passages.
Contested Expansion Count scatters neutral objectives over free terrain using
the seed. Placement compares complete layouts to balance estimated access from
the player bases while reducing large empty sectors. Individual sites may favor
different players; they are no longer all attracted to player medians. Access is
estimated from base-to-objective distances before relief and water generation,
not from unit travel times. Footprint safety and spacing can reduce the achieved
count on crowded maps. With a single objective, equal access takes priority.
Important density controls:
Has Plateaus: creates separate role-aware high-ground platforms for starting bases, natural expansions, later player expansions and contested expansions.Plateau Relief Scale: vertical separation between strategic tiers.Plateau Footprint Scale: buildable top size around each strategic location. Values up to 2.0 are supported; nearby strategic zones and map borders can reduce the effective size to preserve valid spacing.Plateau Contour Irregularity: strength of broad lobes and recesses in the platform outline; it does not add noisy single-cell teeth.Plateau Ramp Width: width of planned accesses in grid cells.Plateau Edge Thickness: thickness of the non-walkable cliff border.- Plateau outer walls automatically use the biome's
Cliff Prefabs, even when Has Cliffs is disabled. Prefabs are fitted to the complete wall length and height, while ramp openings remain clear and traversable.
- Plateau coastlines remain port-accessible: with
Has Cliffs disabled, the complete land/water boundary uses a continuous low shelf and sloped mesh transition. With cliffs enabled, only high shore sections can stay abrupt; low buildable beach openings remain free of vertical faces and cliff prefabs.
Plateau Forest Density Multiplier: proportion of the global forest coverage allowed as natural pockets on safe plateau tops when both forests and plateaus are enabled. Zero disables summit forests; build pads, ramps and strategic paths stay clear.Natural Expansion Second Access: gives each natural a second outward ramp toward its choke or the map center when space permits.Ramp Dirt Path Approach Length: length of the visibly worn path before and after each ramp.Ramp Dirt Path Approach Width: width multiplier for these tapered traffic zones.Has Cliffs: covers generated steep terrain walls with the configured cliff prefabs.Cliff Prefab Length Axis: axis used as the wall length; Auto selects the largest horizontal renderer extent.Cliff Tiles Per Prefab: preferred number of connected terrain edges covered by one stretched detail. The default of twelve substantially reduces GameObject count; unsafe curvature still forces an automatic split.Cliff Depth Scale: scales the prefab only across the wall. The 0.72 default reduces overlap on plateau tops and low ground while keeping the abrupt face centered.Cliff Height Scale: enlarges cliff details around the center of the abrupt face, making their top visibly overhang the high ground while retaining low-side coverage. The safe default and runtime minimum are 1.15; older serialized values are upgraded automatically.Ramp Cliff Depth Scale: dedicated cross-ramp depth for the two inclined rails. The 1.15 default makes ramp borders more substantial without thickening every other cliff.Ramp Cliff Inset: places each rail's inner renderer face beneath the ramp edge. The 0.32 default keeps the prefab tight against the complete descent while the remaining depth grows outward. Maps saved with the former 0.12 default are upgraded automatically.Cliff Segment Overlap: small world-space overlap that closes seams between neighboring details and at corners.Cliff Vertical Overlap: extra coverage above/below the measured height break.
Cliff prefab renderer bounds are centered on the actual steep face, independently of the prefab root pivot. The grid-to-world half-cell offset is applied automatically. Every ramp component creates exactly two continuous lateral cliff rails. Each rail uses one prefab stretched between the high and low caps and pitched in 3D to follow the ramp slope. Its inner renderer face is aligned under the ramp boundary rather than centering the whole prefab on it, so the border stays flush while most of its depth remains outside the playable ramp; the access center and both caps remain open. In the Unity Editor, generated details remain connected prefab instances; runtime generation uses ordinary instantiated GameObjects.
Cliff Run Height Tolerance: maximum height variation merged into one straight wall band.Mark Cliff Cells Unbuildable: prevents construction on cells directly touching a generated wall without changing ramp walkability.Island Contour Irregularity: strength of broad coves, asymmetric coastal lobes and tapered peninsulas in the Islands water layout; protected strategic land and naval choke corridors are unaffected.Additional Naval Zones (serialized as the backward-compatible NavalZones field): secondary water features added after the selected layout's primary feature. Zero still generates water. Lake always starts with one broad central lake, while additional zones become smaller separated lakes at seeded random positions; River starts with one river and adds the requested count.Has Bridges: procedural rivers crossing a protected choke path receive a bridge perpendicular to the local river course, keeping the river continuous underneath. Oblique paths reconnect to its dry landings. The river must flow across both sides and the path must continue on both dry banks; tangencies, parallel flow and dead ends do not request a path bridge. Assign River Bridge Prefab and keep clear landings within River Bridge Max Span.- River channels avoid the entire open area of main bases and all expansions, using
Player Base Forest Clear Radius and Expansion Forest Clear Radius even without forests. These shared radii are also exposed under River shape. The first river uses the center when its full channel fits; an occupied central clearing takes priority. Additional rivers and Random resolving to River use the same protection. Rivers may pass between settlements when enough space remains for their width.
Player Plateau Border Safety Distance: minimum 0–20 cell clearance between a main player plateau border and the map boundary. Zero lets rotational lake layouts fit plateaus directly against the perimeter and maximizes their distance from the central lake.Main Base Ramp Count: requests 1–4 planned accesses per main-base plateau. Accesses are distributed as an inward-facing fan and the lake footprint keeps a dry land band beyond them.Symmetry: None: samples several seeded candidates, then randomly selects among those that fill unused space well enough. This keeps layouts genuinely irregular without allowing a very large unused region. Any incomplete main-base result is simulated again, up to five total attempts, before generation retains and reports the best layout.Island Minimum Water Gap: contour-to-contour clearance for unrelated islands, from 2 to 16 cells (default 6). Player-island radius adaptation and bonus/expansion placement use the same value.- Procedural island silhouettes include compact, elongated, crescent/C, hook/J, forked, L, P, rugged and potato-like families. Player islands rotate through the strongly distinct families so a seed cannot accidentally make every coast compact, and their defining branches extend beyond the protected build core. Player forests receive an identical cell-area quota based on the most constrained island; some trees may enter the buildable ring, but the HQ core, paths and resource access remain clear.
Mountain Zone Count: independent ridge or massif formations.Mountain Max Area: maximum footprint per formation, including foothills.Mountain Chain Width: width multiplier; both ridge sides vary independently.Mountain Rise Sharpness: crest sharpness without removing the foothill transition.Mountain Path Clearance: open buffer around strategic routes, choke corridors, ramps, resources and imported DirtPaths.Path Connection Count: one gives towns and expansions essential access to the road network; higher values add alternative settlement links.Random Long Path Count: extra map-spanning roads; zero is recommended for a clean layout.Path Branch Count: maximum extra decorative branches beyond local town streets; the actual extra number is randomized.
Procedural roads stay curved with Enable Path Smoothing on or off. The
option refines their contours without selecting a different road network.
Towns connect to natural expansions, other expansion sites and strategic
arteries through safe terrain. Roads do not automatically trace forest
outlines or connect unrelated mines to one another.
Procedural bases act as towns with irregular dirt hubs and
4–6 curved local streets; expansions use 3–5 shorter arms. Their rotation,
length and curvature vary with the map seed. Arms shorten or disappear near
water, mountains, resources, ramps and height breaks. Imported image paths
retain their authored footprint.
Free ends of curved paths and base arms taper to points. Their edge variation
fades out at the tip; connected roads and ramp mouths retain their width.
Dirt paths and ramp approaches have a shallow 0.02-unit recess, with edges
blending into the ground and ramp mouths. Their colliders follow the same
surface. The depth remains 0.02 Unity units when Cell Size changes.
4. Generate from an image
- Select
Image generation mode.
- Assign
Source Map Image.
- Enable Read/Write in the texture import settings.
- Assign a
MapGeneratorImageLayer set, or use Auto Match when its source-name patterns match the image family.
- Keep related scans in one shared layer set by adding a common pattern such as
PhotoScan_2. Matching ignores case, spaces, punctuation, copy suffixes and file extensions.
- Use semantic layer prefixes (
Grass, Forest, DirtPath, Water/Lava, Mountain) so imported cells receive the correct gameplay behavior and biome-material fallback.
- Keep Enable Image Ground Relief enabled for subtle seeded altitude variation; tune its strength and scale when a flatter or broader result is preferred.
- Leave Import Image Resources disabled when gold mines and oil fields will be placed manually.
- Generate and tune tolerance/vote values only if the scan contains unusually strong lighting or compression noise.
The importer is tolerant of paint and JPEG variation, including low-saturation black, gray, silver and white regions. Water and Lava layers generate both navigable water classification and the continuous underwater-floor terrain mesh; their visible surface and seabed extend beneath at least one neighboring coastal cell to prevent shoreline gaps. This overlap is visual only and does not make ground cells navigable as water. The inspector reports a blocking validation error when the source texture is missing or not readable, and warns about duplicate prefixes or unresolved custom materials.
Procedural contour smoothing
Enable Procedural Contour Smoothing is enabled by default, with strength
0.85. It reuses the image importer's geometric relaxation on the final forest,
mountain and shoreline contours. Adjust Procedural Contour Smoothing Strength
in the Simple terrain settings or Expert scene settings; zero or disabling it
restores the previous geometry, including the optional planar vertex noise.
The deformation affects shared render/collision vertices only. It preserves
cell types, heights, resources, strategic plateaus, ramps, reserved land routes
and bridge approaches. Curved dirt paths retain their separate path-smoothing
control. Water is rebuilt from the final contour field after terrain generation,
without repeating water placement or connectivity rules. Image contour controls
retain their existing behavior and source-image boundary fitting.
Logical base/expansion/resource regions, plateau interiors and broad vegetation
clearance masks do not freeze decorative forest boundaries. Physical resource
anchors, ramps, plateau edges, bridges and narrow choke geometry remain pinned.
Mountain footprints may be smoothed even though their gameplay type is Blocked;
other blockers stay pinned. Coastlines and mountain outlines take priority over
decorative material junctions so grass/forest changes do not interrupt the curve.
Vegetation exclusions and strategic route reservations are retained unchanged.
5. Runtime generation
using Sorolif.RTS.MapGenerator;
using UnityEngine;

public sealed class RuntimeMapExample : MonoBehaviour
{
    [SerializeField] private MapGenerator generator;

    private void Start()
    {
        generator.Definition.UseRandomSeed = false;
        generator.Definition.Seed = 20260711;

        ProceduralMapGenerationResult result =
            generator.GenerateRuntimeMap();

        if (!result.Succeeded)
            return;

        Debug.Log($"Generated {result.Grid.Size}x{result.Grid.Size} map");
    }
}
ProceduralMapGenerationResult exposes the generated root, grid, strategic cell positions and player spawn world positions.
The complete public entry-point reference and an editable integration example
are documented in RuntimeAPI.md. UPM installations expose the
example in Package Manager's Samples section; the classic Asset Store package
places it under Examples/Runtime Generation.
6. Generate a map screenshot
Enable Generate Screenshot After Generation in the Screenshot section. Top-down is the default view. In Expert mode, select Isometric and configure pitch and yaw when a three-quarter presentation better exposes terrain elevation. Both modes fit all eight corners of the generated renderer bounds. Configure Screenshot Output Folder, resolution, padding, background and the LayerMask to include. The capture uses its own temporary orthographic camera and therefore does not require a scene camera.
Relative folders are resolved from the Unity project root in the Editor and from Application.persistentDataPath in a player build. Absolute folders are used unchanged. The default filename is MapName_Seed.png; disable Screenshot Overwrite Existing to preserve an existing image and append a timestamp instead.
Use Capture Map Screenshot to capture an already generated map manually. At runtime, the resulting absolute path is returned in ProceduralMapGenerationResult.ScreenshotPath:
ProceduralMapGenerationResult result = generator.GenerateRuntimeMap();

if (result.Succeeded && !string.IsNullOrEmpty(result.ScreenshotPath))
    Debug.Log(result.ScreenshotPath);
Map altitude
For broad relief in either generation mode, enable Map altitude in the
Simple or Expert Inspector. Set its minimum and maximum offsets and optionally
assign a readable grayscale height map; otherwise seeded hills are generated.
See MapAltitude.md for image orientation, geometry and runtime
sampling. Regenerate after changing these settings.
7. Save and reload recipes
After generating in the editor, use Save Current to create a MapGenerationSaveData asset. Reload Saved reapplies its definition and seed, then regenerates the map.
The save asset stores the generation recipe and strategic positions; it does not duplicate all generated meshes as source assets.
8. Optional integrations
The core package has no mandatory third-party dependency.
- A* Pathfinding Project: automatically detected at runtime through reflection.
SOROLIF_RTS_INTEGRATION: enables internal Sorolif GPU-instancing hooks when those types are available.SOROLIF_MAPGEN_VERBOSE_LOGS: enables detailed subsystem logs for diagnostics.
Do not enable the Sorolif RTS integration symbol in a standalone project unless you also provide its corresponding framework assemblies.
See Compatibility.md for the verified release environment,
render-pipeline behavior, performance considerations and features intentionally
left to the host RTS project.
Open the included examples
For a ready-made example, choose Tools > Sorolif > Map Generation > Open Included Procedural Demo or Open Included Image Demo. Unity creates a new
editable scene copy under Assets/SorolifMapGenerationExamples and opens it.
Existing copies are preserved. The terrain
is visible as soon as the scene opens. Select the Map Generator to inspect its
assigned recipe, or enter Play Mode to regenerate it automatically through the
included QuickStartDemo component. No third-party content or optional runtime
sample import is needed. Four presets, materials and illustrative cube-based
prefabs are included under QuickStart.
The commands work for both distributions; UPM scenes cannot open directly
from the read-only package. UPM materials and presets belong to the package cache; duplicate the biome or material into
Assets to customize it. Remove or disable QuickStartDemo once your own startup
code calls the runtime API. The creation wizards remain available for producing
fresh editable examples in Assets/SorolifMapGenerationStarter.